(Moved detailed technical data out of the introductory paragraph and into a new paragraph near the end, along with additional details about wave timing and composition.) Tag: Visual edit |
m (Reverted edits by Never die PROER (talk) to last version by DuckLobber) |
||
| (28 intermediate revisions by 16 users not shown) | |||
| Line 3: | Line 3: | ||
{{Quote|Defend the safe from killer robots! The longer you defend, the better the reward!}} |
{{Quote|Defend the safe from killer robots! The longer you defend, the better the reward!}} |
||
{{Title Icon}} |
{{Title Icon}} |
||
| − | In the Robo Rumble [[Event]], three players battle as a team against |
+ | In the Robo Rumble [[Event]], three players battle as a team against 9 waves of robot enemies to protect a safe for 2 minutes. With each win, the difficulty will increase in the next level. Robo Rumble is an unranked mode, so [[Trophies]] cannot be earned or lost. |
| − | [[File:Robots. |
+ | [[File:Robots.png|250px|right]] |
| − | There are four types of |
+ | There are four types of robots: a "Melee Robot" with high health and fast attacking speed but short range and slow movement speed, a "Sniper Robot" with low health, moderate movement speed, moderate attack speed but long-range and fast projectile speed, a "Mini Robot" with moderate hitpoints, short-range, fast attacking speed and very fast movement speed, and a "Boss Robot" with very high hitpoints and damage. The boss robot has a melee attack and can shoot rockets, and one arrives on wave 5. After a boss robot arrives, all robots after that have increased health and damage. If the robots are not destroyed after 90 seconds, they will become enraged, gain extra movement speed, and will only target the safe. |
| − | The first wave starts immediately and each new wave of robots starts 12 seconds after the prior wave began, except after a Boss wave when there is a 22 |
+ | The first wave starts immediately and each new wave of robots starts 12 seconds after the prior wave began, except after a Boss wave begins, when there is a 22-second gap instead. There are 4 waves in each of the first "set" of waves, consisting of two wave with 2 robots, then a wave with 3 robots, then a wave with 4 robots, and finally a Boss robot before the next set of waves begins. After the Boss robot in wave 5, the number of robots per wave will continue to increase by one additional robot every wave, eventually resulting in waves with 5 or more robots. |
| − | |||
| − | The maximum survival time possible is 13 minutes and 14 seconds. Reaching this time will cause the match to end immediately. |
||
==Robot Statistics== |
==Robot Statistics== |
||
| Line 17: | Line 15: | ||
!Sniper Robot Health / Damage |
!Sniper Robot Health / Damage |
||
!Mini Robot Health / Damage |
!Mini Robot Health / Damage |
||
| − | !Boss Robot Health / Damage |
+ | !Boss Robot Health / Rocket Damage / Melee Damage |
| + | !Color |
||
| − | !Colour |
||
|- |
|- |
||
|Normal |
|Normal |
||
| Line 24: | Line 22: | ||
|2,000 / 630 |
|2,000 / 630 |
||
| - |
| - |
||
| − | |45,000 / |
+ | |45,000 / 900 / 600 |
|Grey |
|Grey |
||
|- |
|- |
||
| Line 31: | Line 29: | ||
|3,600 / 1,130 |
|3,600 / 1,130 |
||
|5,400 / 720 |
|5,400 / 720 |
||
| − | |55,000 / |
+ | |55,000 / 900 / 640 |
|Purple |
|Purple |
||
|- |
|- |
||
| Line 38: | Line 36: | ||
|4,600 / 1,450 |
|4,600 / 1,450 |
||
|6,900 / 920 |
|6,900 / 920 |
||
| − | |65,000 / |
+ | |65,000 / 900 / 680 |
|Red |
|Red |
||
|- |
|- |
||
| Line 45: | Line 43: | ||
|6,700 / 1,760 |
|6,700 / 1,760 |
||
|10,080 / 1,120 |
|10,080 / 1,120 |
||
| + | | - |
||
| − | |<nowiki>-</nowiki> |
||
|Yellow |
|Yellow |
||
|- |
|- |
||
| Line 52: | Line 50: | ||
| - |
| - |
||
| - |
| - |
||
| + | | - |
||
| − | |<nowiki>-</nowiki> |
||
|White |
|White |
||
|} |
|} |
||
==Useful Brawlers== |
==Useful Brawlers== |
||
| − | *'''[[8-BIT]]''' |
+ | *'''[[8-BIT]]:''' 8-BIT does excellent damage from a safe distance, and the damage boost from his turret is as good as having a 4th team member. He has a lot of long corridors to shoot down, though will do less damage to robots standing at corners in those corridors, due to his projectiles not wrapping around corners at all, so lure those robots a little closer first to do maximum damage per shot. Save his first turret for the first boss, then start using them for the vault as well. |
| − | *'''[[Pam]]''' |
+ | *'''[[Pam]]:''' Pam has really high damage output if all her scrap pieces hit a target, and above-average health. She can also use her healing station to keep teammates alive. Both her Star Powers are really good options, planting her Healing Station adjacent to the Safe can damage Mini and Melee bots if you use Mama's Squeeze, and Mama's Hug is a good healing option, which can help soak the Boss' damage, especially with more Pams. |
| + | *'''[[Jessie]]:''' She can place her Super near the safe so the enemies can be eliminated faster or decide to attack Scrappy instead. Jessie's Star Power is really good for her Super as it can hit multiple enemies with each attack using Shocky. |
||
| − | *'''[[Darryl]]''' |
+ | *'''[[Darryl]]:''' He has very high health as well as the potential to deal a lot of damage to robots, taking them out very quickly without destroying the walls that are helping to protect the safe. Also, his Super can interrupt the Boss Robots' rocket attack, preventing it from dealing great damage and from breaking walls which will pose a disadvantage in later rounds. |
| − | *'''[[Rosa]]''' |
+ | *'''[[Rosa]]:''' When Rosa has her Super activated, she can easily take hits for the team or for the safe. In addition, she has a wide-area attack that reloads fairly fast. |
| − | *'''[[Rico]]''' |
+ | *'''[[Rico]]:''' Rico has an exceptionally fast reload speed and potentially higher than average damage with his Super Bouncy. |
==Tips== |
==Tips== |
||
| − | *Respawn time is 7 seconds instead of the normal 3, so it is important to stay alive. |
||
*Don't be separated from your team. Try to stay close to the safe and destroy as many robots as you can. |
*Don't be separated from your team. Try to stay close to the safe and destroy as many robots as you can. |
||
| + | *The respawn delay is long in this event, so it is critical to avoid being knocked out. |
||
*Set up a perimeter around the safe with your teammates, guarding every entry point. Failure to do this will result in some projectiles hitting the safe before you can react. |
*Set up a perimeter around the safe with your teammates, guarding every entry point. Failure to do this will result in some projectiles hitting the safe before you can react. |
||
| − | *In the early game, try to make sure everyone charges their |
+ | *In the early game, try to make sure everyone charges their Super since the weaker robots make this easier. |
| − | *Place turrets immediately adjacent to the vault, not centered on it, so that they can protect the safe from robot projectiles and melee damage in an emergency. If a teammate is neglecting one side of the safe, put the turret on that side. If you have multiple team members with turrets, place the turrets on different sides of the vault to maximize protection. |
+ | *Place turrets immediately adjacent to the vault, not centered on it, so that they can protect the safe from robot projectiles and melee damage in an emergency. If a teammate is neglecting one side of the safe, put the turret on that side. If you have multiple team members with turrets, place the turrets on different sides of the vault to maximize protection. |
| − | *Fight the bosses far enough |
+ | *Fight the bosses far enough away from the safe that they won't damage it or the closest walls, but close enough to the safe that you can quickly return to protect it from the next wave of robots after defeating the bosses. |
*Use the fewest shots needed to kill a robot. If you waste too many shots while killing robots, you won't have that attack ready for when more robots arrive (this is especially crucial towards the end of the game). Take into account the damage your teammates typically do in finishing off the robots. |
*Use the fewest shots needed to kill a robot. If you waste too many shots while killing robots, you won't have that attack ready for when more robots arrive (this is especially crucial towards the end of the game). Take into account the damage your teammates typically do in finishing off the robots. |
||
| − | *Before the game starts, you can calculate how many shots you need to take out a single robot based on its type/color. Use this to save ammo. |
+ | *Before the game starts, you can calculate how many shots you need to take out a single robot based on its type/color. Use this to save ammo. |
*If you have something that deals passive damage to enemies (like Jessie's turret or Tara's attacking shadow), you can let it finish a weakened robot to save a shot. |
*If you have something that deals passive damage to enemies (like Jessie's turret or Tara's attacking shadow), you can let it finish a weakened robot to save a shot. |
||
| − | *Robo Rumble is an awesome way to get lots of [[Tokens]]. A peak reward of 32 Tokens per [[Ticket]] is achieved at a time of 6:15. |
||
*Brawlers who can destroy walls (e.g. [[Shelly]], [[Frank]] or [[Brock]]) may pose a disadvantage in this mode since this leaves the safe more open for damage from robots. |
*Brawlers who can destroy walls (e.g. [[Shelly]], [[Frank]] or [[Brock]]) may pose a disadvantage in this mode since this leaves the safe more open for damage from robots. |
||
Revision as of 02:09, 15 May 2020

In the Robo Rumble Event, three players battle as a team against 9 waves of robot enemies to protect a safe for 2 minutes. With each win, the difficulty will increase in the next level. Robo Rumble is an unranked mode, so Trophies cannot be earned or lost.
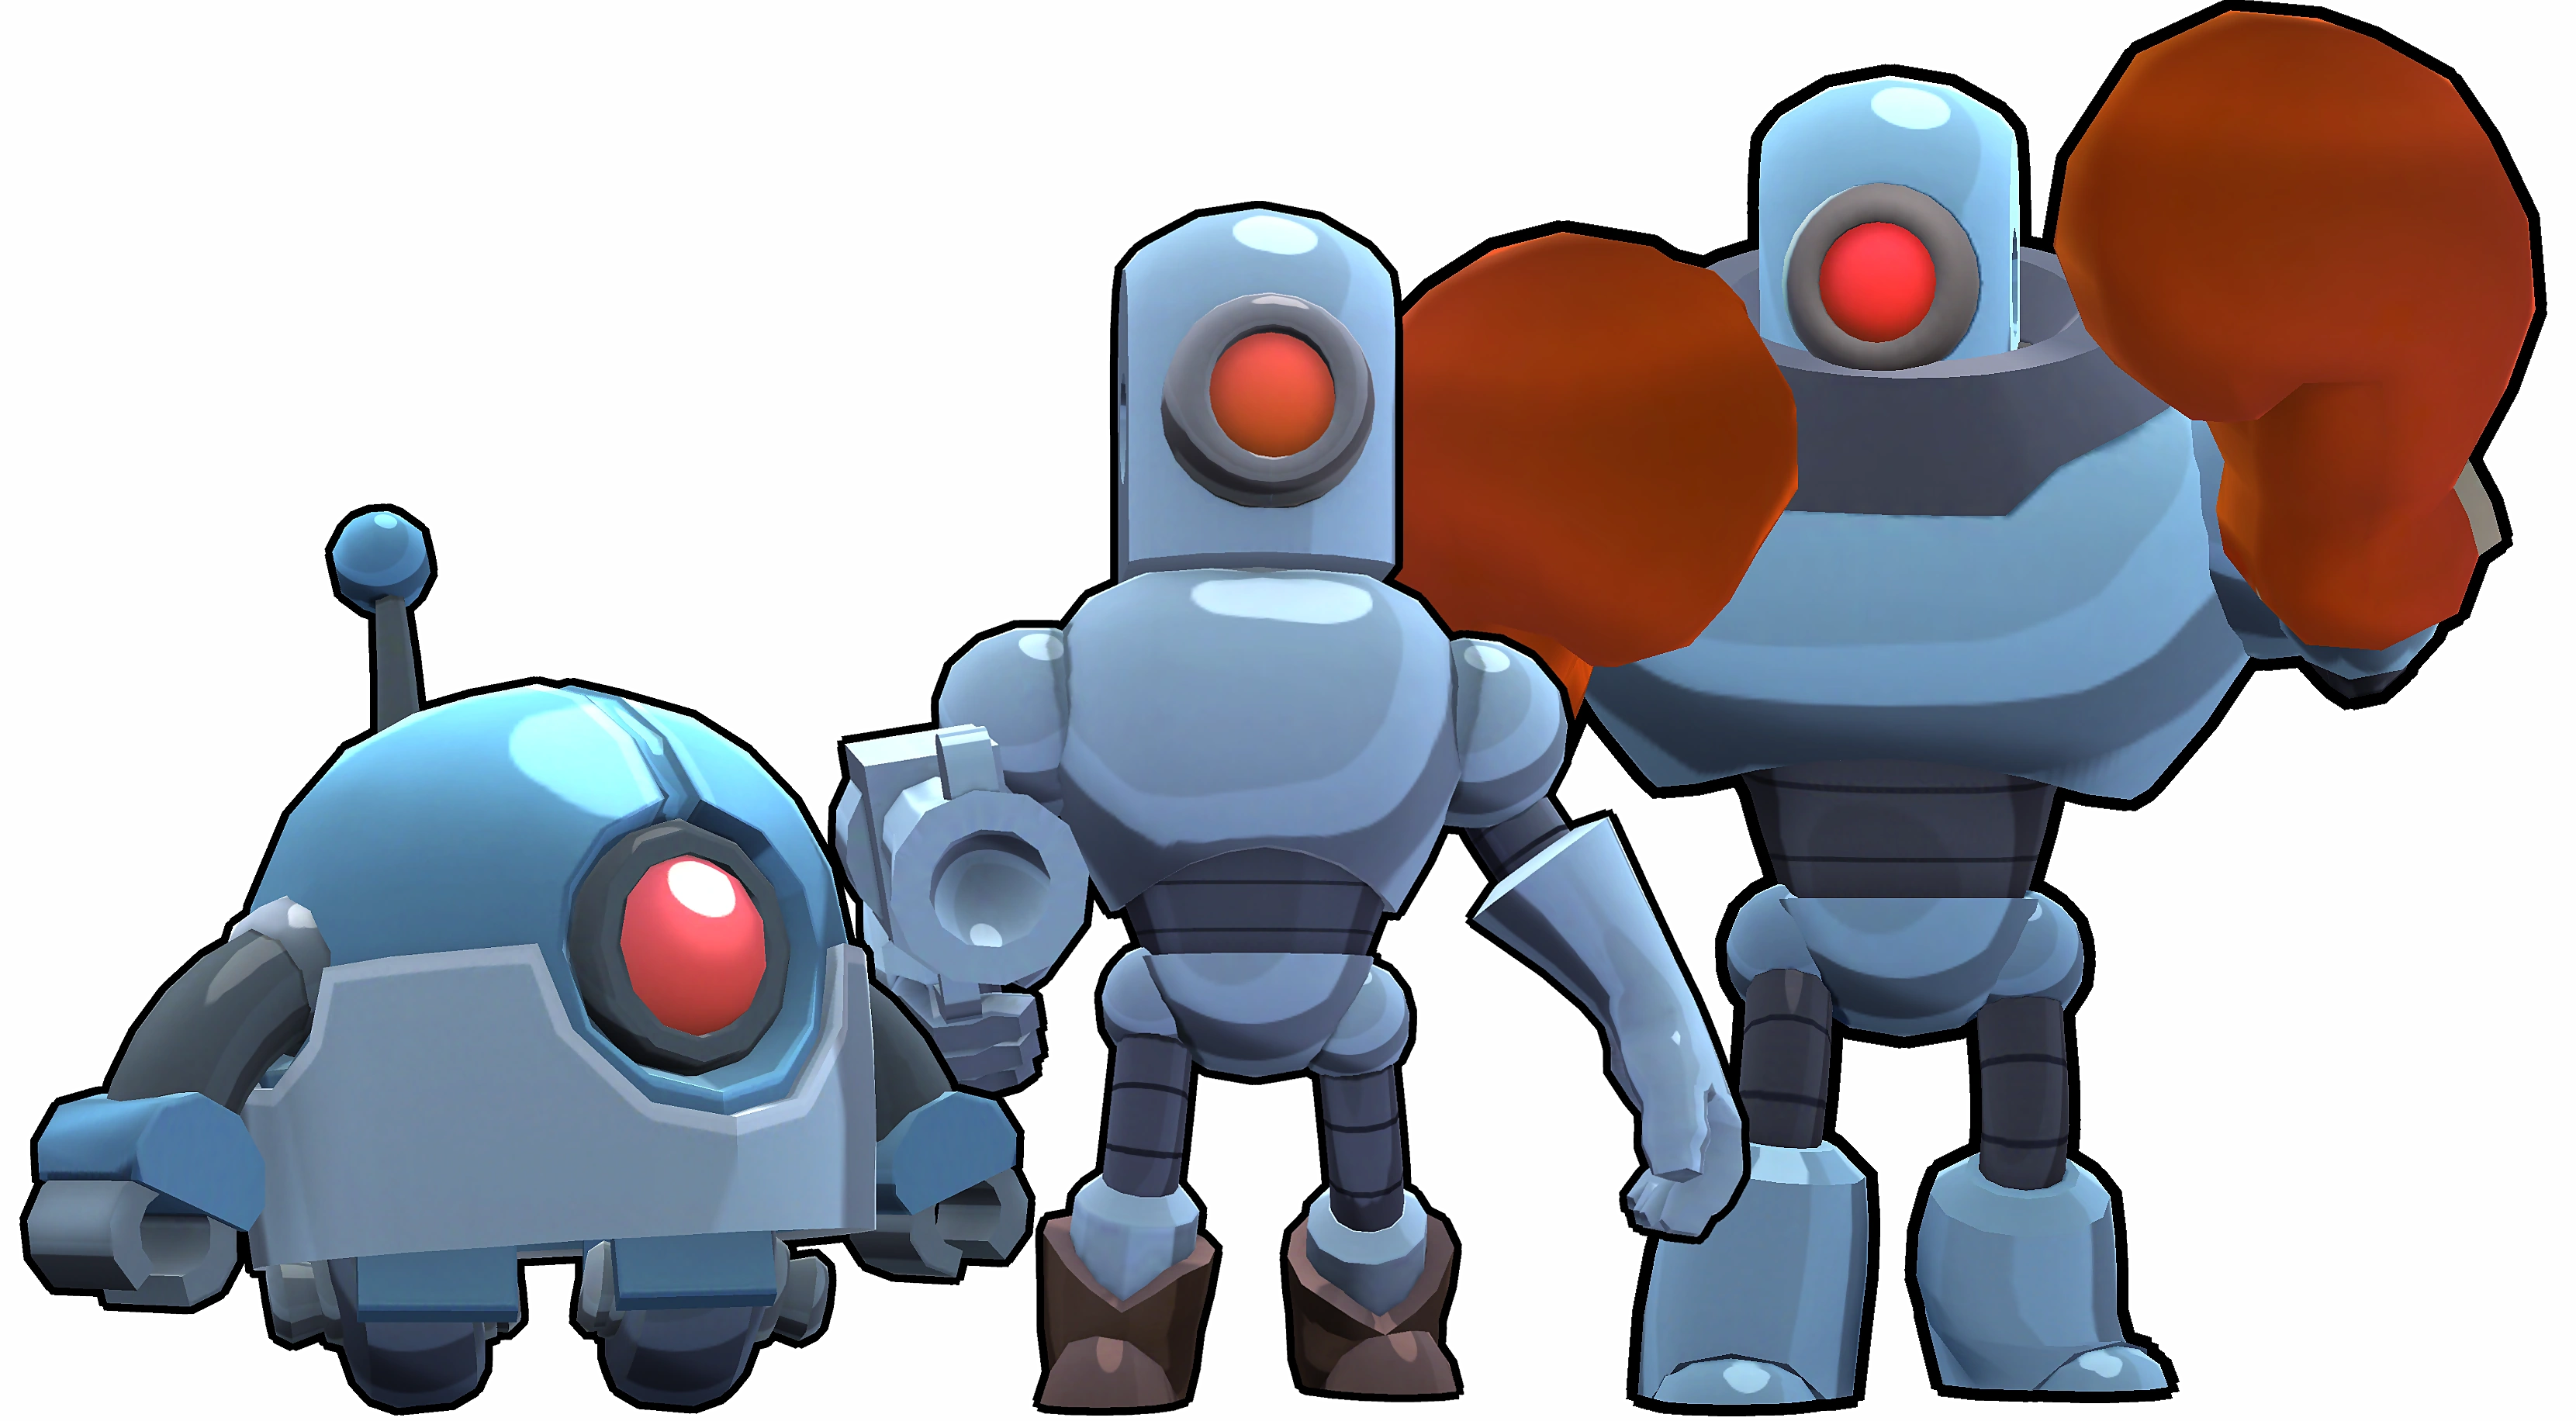
There are four types of robots: a "Melee Robot" with high health and fast attacking speed but short range and slow movement speed, a "Sniper Robot" with low health, moderate movement speed, moderate attack speed but long-range and fast projectile speed, a "Mini Robot" with moderate hitpoints, short-range, fast attacking speed and very fast movement speed, and a "Boss Robot" with very high hitpoints and damage. The boss robot has a melee attack and can shoot rockets, and one arrives on wave 5. After a boss robot arrives, all robots after that have increased health and damage. If the robots are not destroyed after 90 seconds, they will become enraged, gain extra movement speed, and will only target the safe.
The first wave starts immediately and each new wave of robots starts 12 seconds after the prior wave began, except after a Boss wave begins, when there is a 22-second gap instead. There are 4 waves in each of the first "set" of waves, consisting of two wave with 2 robots, then a wave with 3 robots, then a wave with 4 robots, and finally a Boss robot before the next set of waves begins. After the Boss robot in wave 5, the number of robots per wave will continue to increase by one additional robot every wave, eventually resulting in waves with 5 or more robots.
Robot Statistics
| Version | Melee Robot Health / Damage | Sniper Robot Health / Damage | Mini Robot Health / Damage | Boss Robot Health / Rocket Damage / Melee Damage | Color |
|---|---|---|---|---|---|
| Normal | 4,800 / 260 | 2,000 / 630 | - | 45,000 / 900 / 600 | Grey |
| Angry | 6,800 / 470 | 3,600 / 1,130 | 5,400 / 720 | 55,000 / 900 / 640 | Purple |
| Furious | 11,000 / 600 | 4,600 / 1,450 | 6,900 / 920 | 65,000 / 900 / 680 | Red |
| Enraged | 16,200 / 730 | 6,700 / 1,760 | 10,080 / 1,120 | - | Yellow |
| God Mode | - | - | - | - | White |
Useful Brawlers
- 8-BIT: 8-BIT does excellent damage from a safe distance, and the damage boost from his turret is as good as having a 4th team member. He has a lot of long corridors to shoot down, though will do less damage to robots standing at corners in those corridors, due to his projectiles not wrapping around corners at all, so lure those robots a little closer first to do maximum damage per shot. Save his first turret for the first boss, then start using them for the vault as well.
- Pam: Pam has really high damage output if all her scrap pieces hit a target, and above-average health. She can also use her healing station to keep teammates alive. Both her Star Powers are really good options, planting her Healing Station adjacent to the Safe can damage Mini and Melee bots if you use Mama's Squeeze, and Mama's Hug is a good healing option, which can help soak the Boss' damage, especially with more Pams.
- Jessie: She can place her Super near the safe so the enemies can be eliminated faster or decide to attack Scrappy instead. Jessie's Star Power is really good for her Super as it can hit multiple enemies with each attack using Shocky.
- Darryl: He has very high health as well as the potential to deal a lot of damage to robots, taking them out very quickly without destroying the walls that are helping to protect the safe. Also, his Super can interrupt the Boss Robots' rocket attack, preventing it from dealing great damage and from breaking walls which will pose a disadvantage in later rounds.
- Rosa: When Rosa has her Super activated, she can easily take hits for the team or for the safe. In addition, she has a wide-area attack that reloads fairly fast.
- Rico: Rico has an exceptionally fast reload speed and potentially higher than average damage with his Super Bouncy.
Tips
- Don't be separated from your team. Try to stay close to the safe and destroy as many robots as you can.
- The respawn delay is long in this event, so it is critical to avoid being knocked out.
- Set up a perimeter around the safe with your teammates, guarding every entry point. Failure to do this will result in some projectiles hitting the safe before you can react.
- In the early game, try to make sure everyone charges their Super since the weaker robots make this easier.
- Place turrets immediately adjacent to the vault, not centered on it, so that they can protect the safe from robot projectiles and melee damage in an emergency. If a teammate is neglecting one side of the safe, put the turret on that side. If you have multiple team members with turrets, place the turrets on different sides of the vault to maximize protection.
- Fight the bosses far enough away from the safe that they won't damage it or the closest walls, but close enough to the safe that you can quickly return to protect it from the next wave of robots after defeating the bosses.
- Use the fewest shots needed to kill a robot. If you waste too many shots while killing robots, you won't have that attack ready for when more robots arrive (this is especially crucial towards the end of the game). Take into account the damage your teammates typically do in finishing off the robots.
- Before the game starts, you can calculate how many shots you need to take out a single robot based on its type/color. Use this to save ammo.
- If you have something that deals passive damage to enemies (like Jessie's turret or Tara's attacking shadow), you can let it finish a weakened robot to save a shot.
- Brawlers who can destroy walls (e.g. Shelly, Frank or Brock) may pose a disadvantage in this mode since this leaves the safe more open for damage from robots.