No edit summary Tag: Visual edit |
m (Reverted edits by Ninjadisnuts (talk) to last revision by CoolEd1) Tag: Rollback |
||
| Line 128: | Line 128: | ||
:'''[[Rico]]:''' With his Robo Retreat Star Power, keeping Rico's health below 40% is a viable strategy. The speed boost he gains when at low health can buy time for his teammates to respawn. Rico needs to find a wall and a suitable angle to maximize the damage from his Super. |
:'''[[Rico]]:''' With his Robo Retreat Star Power, keeping Rico's health below 40% is a viable strategy. The speed boost he gains when at low health can buy time for his teammates to respawn. Rico needs to find a wall and a suitable angle to maximize the damage from his Super. |
||
:'''[[Bea]]:''' Despite her low health, collecting the Power Cubes allows Bea's supercharged shot to deal devastating amounts of damage to both the robot minions and the Boss while safely maintaining distance, further helped by her slowing Super and Rattled Hive Gadget, which can defeat multiple robot minions more easily. It is highly recommended to use Bea's Star Power Honey Coat as it can prove to be incredibly lifesaving either to avoid losing the Power Cubes or if she is the only standing teammate, so Bea must stay alive as much as possible throughout the match to avoid wasting the Star Power earlier on and save it for very late-game. |
:'''[[Bea]]:''' Despite her low health, collecting the Power Cubes allows Bea's supercharged shot to deal devastating amounts of damage to both the robot minions and the Boss while safely maintaining distance, further helped by her slowing Super and Rattled Hive Gadget, which can defeat multiple robot minions more easily. It is highly recommended to use Bea's Star Power Honey Coat as it can prove to be incredibly lifesaving either to avoid losing the Power Cubes or if she is the only standing teammate, so Bea must stay alive as much as possible throughout the match to avoid wasting the Star Power earlier on and save it for very late-game. |
||
| + | :'''[[Edgar]]:''' Having an extremely fast reload and the ability to heal per hit, Edgar can continually damage the Boss despite his very short range. His Super is particularly useful as it charges automatically and its speed boost can help Edgar avoid the long-range attacks; for this, he can also use his Let's Fly Gadget in emergency situations. |
||
| − | : |
||
==Tips== |
==Tips== |
||
Revision as of 01:25, 27 January 2021

In the Boss Fight Event, three players battle against a gigantic Boss Robot. The battle starts immediately and slowly grows harder. With each win, the difficulty will increase in the next level. The Boss robot uses a wide range of attacks and has a colossal amount of health. A timer is shown to keep track of anger levels and to compare times with others. Boss Fight is an unranked mode, so Trophies cannot be earned or lost. If you are playing with teammates, the level is set to the lowest that the members of your team have reached. Brawlers' attacks and Supers are 3 times less effective at charging Supers in this mode.
Boss Abilities
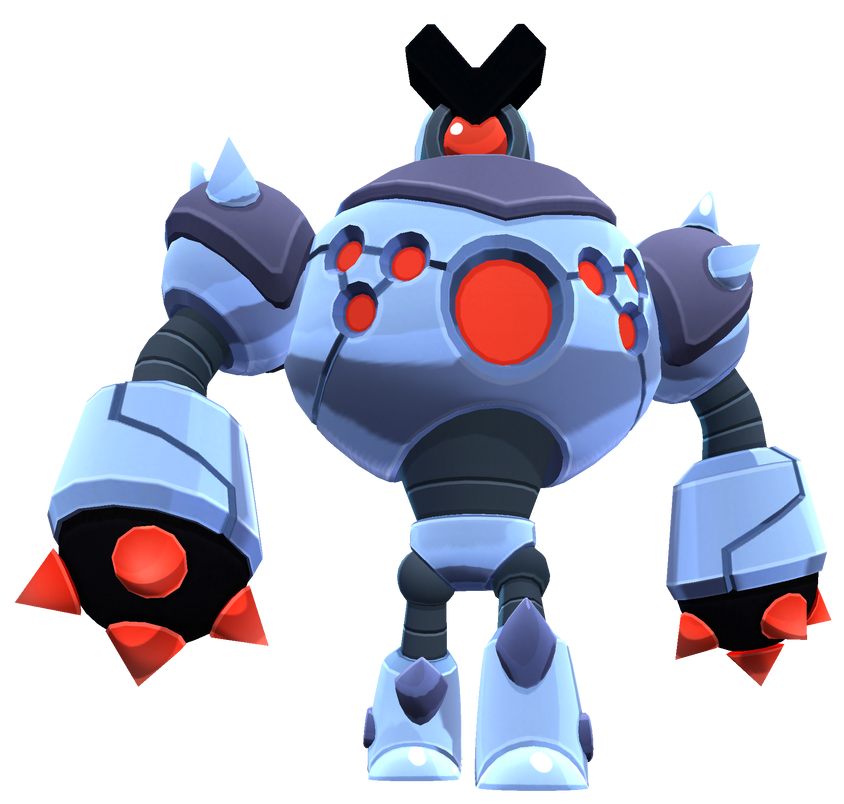
- Anger: As the fight goes on, the Boss becomes increasingly angry which increases the Boss' damage output, speed, and the difficulty of dodging his attacks. The Boss gets angry based on time, not damage taken.
- Melee attack: The boss punches any target that gets too close, dealing 800+ damage.
- Laser attack: The Boss fires a spread of lasers in quick succession that each deal 1200+ damage. After the furious stage, the lasers can break walls, but stop. After the enraged stage, the lasers break walls and keep going. The Boss stops using the laser attack when the Boss goes god mode.
- Charge: The Boss dashes forward, like Bull's Super, destroying walls and damaging any targets that it hits for 1200+ damage. The Boss stops charging when the Boss goes god mode.
- Long-range rocket: The Boss fires a rocket at the Brawler who is closest to it, dealing 2000+ damage and destroying walls. The area where the rocket will impact is highlighted so that it may be avoided (similar to the Meteor Shower Modifier), and once the rocket hits, the area is engulfed in flames which deal damage over time to any Brawler that stays in the area by 400+.
- Robot Minions: Throughout the fight, smaller robots appear to aid the Boss. These are the same types of robots as those that are seen in Robo Rumble, though with differing health and damage. These minions are also slightly faster and have a 50 point increase to their Robo Rumble counterpart's movement speed. Mini robots only start to appear once minions start to get angry. The robot minion's strength is not dependent on the Boss's anger.
| Boss Statistics | Normal | Angry | Furious | Enraged | God Mode | |
|---|---|---|---|---|---|---|
| Melee Attack | 800 | 1000 | 1200 | 1400 | 9400 | |
| Laser Attack (per laser) | Laser | 1200 | 1400 | 1700 | 2000 | N/A |
| Laser Amount | 6 | 9 | 18 | 18 | N/A | |
| Charge | 1200 | 1400 | 1700 | 2000 | N/A | |
| Long Ranged Rocket | Rocket | 2000 | 2500 | 3000 | 3500 | 4000 |
| Burn | 400 | 500 | 600 | 700 | 800 | |
| Color | Grey | Purple | Red | Yellow | White | |
| Minion Statistics | Normal | Angry | Furious | Enraged |
|---|---|---|---|---|
| Melee Robot Health / Damage | 3600 / 260 | 5100 / 470 | 8250 / 600 | 12150 / 730 |
| Sniper Robot Health / Damage | 1500 / 630 | 2700 / 1130 | 3450 / 1450 | 5040 / 1760 |
| Mini Robot Health / Damage | 2250 / 400 | 4050 / 720 | 5175 / 920 | 7560 / 1120 |
| Color | Grey | Purple | Red | Yellow |
Levels
Every time you beat the Boss, it gains more health, damage, and abilities. The last Boss that you can challenge is Insane XVI.
| Level | Boss Health | Boss' New Abilities |
|---|---|---|
| Normal | 250,000 | Melee and laser attacks, summons robots found in Robo Rumble |
| Hard | 300,000 | Charge |
| Expert | 350,000 | Starts getting angry (1:35) |
| Master | 400,000 | Long-ranged rocket |
| Insane | 500,000 | Starts getting furious (3:15) and lasers now destroy walls after furious, drops Power Cubes along the way |
| Insane II | 600,000 | Starts getting enraged (4:55) and lasers now pierce through walls after enraged |
| Insane III+ | 700,000+ | Now goes god mode (6:35) |
Useful Brawlers
- Colt: Colt has very high damage and can shoot from a long distance, so he can safely avoid the Boss's melee attack, not to mention with his Slick Boots Star Power, he can avoid the Boss’s laser attack and long-range rockets even better due to his increased movement speed. Colt's Super deals massive area damage, making it great for defeating smaller robots along with damaging the Boss. A Colt with Slick Boots should collect the Power Cubes to maximize his damage and keep him alive for the duration of the match. In the situation that Colt needs to deal more damage, his Gadget Speedloader can be used to instantly reload two ammo slots.
- Max: Her high speed gives Max an excellent advantage in dodging attacks from the Boss and minions, as well as enabling her to move out of range easily when she needs to heal. Her Super is beneficial to the entire team, especially when employed while being attacked from multiple directions, or when a teammate will not otherwise be able to run away quickly enough. If she takes the Power Cubes, she can function as an even faster version of Colt while still doing sufficient damage to pass advanced challenge levels. In addition, Max can also support her teammates using her Gadget Phase Shifter's immune shield to block an incoming laser attack.
- Gale: With the Boss Robot's large hitbox, Gale can hit the Boss with all of his snowball attacks, doing maximum damage. With a relatively long range and his Spring Ejector Gadget, Gale can excel at keeping distance between himself and the Boss. Gale's Super can interrupt and stop the Boss from firing his laser attack.
- Pam: Pam has exceptional close-range damage and high health, allowing her to stick close to the Boss. During the earlier anger levels, her Super and Mama's Hug Star Power help the team shrug off damage from the smaller robots and focus on damaging the Boss as much as possible. She will inevitably die late-game in harder levels however due to her inability to dodge chains of missile strikes while also dealing with other attacks from the Boss and minions. Pam will still be useful late-game when she re-spawns, by helping to distract the Boss from Colt and/or Bull and doing damage to the Boss and minions when she can. She can also use her Gadget Pulse Modulator to heal teammates instantly if they are in her Super's radius.
- Bull: Bull's role depends on his partners. With Pam and Colt, he's best in a support role, directing the Boss and protecting his teammates. With Pam and 8-BIT, he can play a much more aggressive role, taking the Power Cubes and focusing on the Boss to take advantage of doing more damage per second than any other Brawler. More skilled players can keep Bull under 60% health to make use of his Berserker Star Power and double the damage output to the Boss, when he is well-supported by his teammates.
- 8-BIT: 8-BIT can provide solid support to a team which is capable of doing extreme damage in the first few minutes of the Boss Fight match. If his turret is well-placed where everyone can take advantage of the damage boost, it is nearly as good as having a fourth team member. His long range and the tight focus of his projectiles is especially well-suited for sniping minions before they can get close to his team members. He may be defeated often starting in the mid-game due to his slow movement speed, but he can still provide good support when he regenerates.
- Rico: With his Robo Retreat Star Power, keeping Rico's health below 40% is a viable strategy. The speed boost he gains when at low health can buy time for his teammates to respawn. Rico needs to find a wall and a suitable angle to maximize the damage from his Super.
- Bea: Despite her low health, collecting the Power Cubes allows Bea's supercharged shot to deal devastating amounts of damage to both the robot minions and the Boss while safely maintaining distance, further helped by her slowing Super and Rattled Hive Gadget, which can defeat multiple robot minions more easily. It is highly recommended to use Bea's Star Power Honey Coat as it can prove to be incredibly lifesaving either to avoid losing the Power Cubes or if she is the only standing teammate, so Bea must stay alive as much as possible throughout the match to avoid wasting the Star Power earlier on and save it for very late-game.
- Edgar: Having an extremely fast reload and the ability to heal per hit, Edgar can continually damage the Boss despite his very short range. His Super is particularly useful as it charges automatically and its speed boost can help Edgar avoid the long-range attacks; for this, he can also use his Let's Fly Gadget in emergency situations.
Tips
- Respawn time is 20 seconds instead of the normal 5, so it is important to stay alive. The Boss will also get harder to defeat as time progresses, making it essential to avoid dying and keep doing damage as quickly as possible.
- The Boss's attacks are very predictable, making them easy to dodge. Make use of the cover to avoid the lasers from the robot. Use walls wisely and try not to destroy too many.
- The Boss will always fire its lasers in a clockwise motion, so it is advised to move counter-clockwise around the Boss if you can't avoid them entirely. It is easier to dodge the lasers entirely when you're close to the Boss, but you risk being hit by more of them if you're not completely out of their range.
- Try to deal as much damage as possible before the Boss becomes angry. The Boss's anger level is not affected by its health level but by the timer. The attacks that the Boss can perform during his higher anger stages make it more difficult to deal damage.
- In Insane levels, one Brawler should focus on collecting all of the Power Cubes. This should be the Brawler with the most speed and range, in order to make the most use of the cubes. Slower and short-ranged Brawlers will usually not be able to survive and get close enough to do much damage late-game. Alternatively, a highly-skilled Bull with Berserker (when partnered with Pam and 8-Bit) can make effective use of the cubes to help stay close to a constantly cornered Boss and do extreme damage. It is important that the designated player collecting the cubes not be defeated, as those cubes will then be lost.
- The Boss will always walk toward (or charge at) the nearest Brawler. Leading the Boss in a specific direction can be used to maneuver them into the most useful position for teammates to damage them, and help prevent them from getting too close to vulnerable teammates.
- In Master and above, the Boss will start shooting rockets that target the closest Brawlers. Have a fast Brawler to stay close to the Boss to attract and dodge rockets and deal damage to the Boss, while having 2 longer range Brawlers to destroy minions and target the Boss from far away.
- You can know whether the Boss is going to use the laser attack or the charge attack. If the Boss makes some sounds and flashes three red lines around, it will fire the lasers. Otherwise, it will charge forward.
- When the Boss stops to use an attack, preferably the laser attack, take the chance to attack it from the side or rear, as it's completely vulnerable to attacks.
- When the Boss gets stunned or knocked back while it uses the lasers, it will abruptly stop shooting the lasers, making it easier for you and your teammates to survive. You can use this to your advantage by stunning or knocking back the Boss when ever it is about to shoot lasers.
History
- On 21/12/18, the Boss Fight event was added to the game.
- On 29/1/19, the message now shows when the next Boss rage stage is triggered. Added one more rage stage, and show in-game which difficulty you are playing. The respawn time was increased by 2 seconds.
- On 27/2/19, fixed a bug that caused the Boss to get stuck in the water after charging.
- On 15/4/19, fixed a bug that allowed Gene to pull the Boss robot so that it got stuck.
- On 18/9/19, the Boss now targets the closest Brawler instead of the farthest Brawler with the rocket attack. Fixed a bug that caused 8-BIT's Extra Life to not work in Boss Fight if he was the last brawler alive.
- On 29/4/20, fixed a bug that caused the Boss to get stuck. Fixed a bug which allowed Boss Fight to be played without Tickets.
- On 20/5/20, fixed a bug that caused server error 43 when stunning or knocking back the boss while charging.